
What
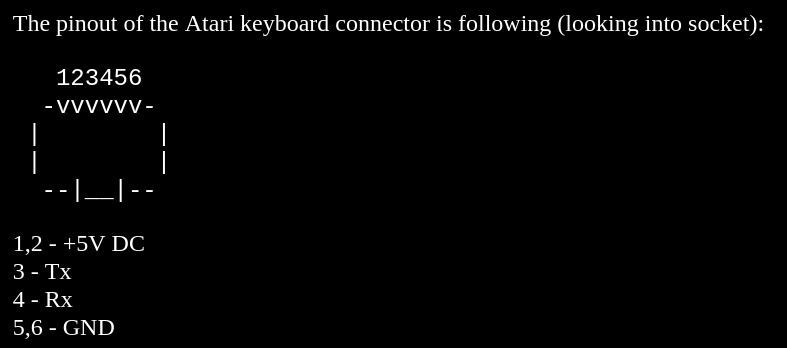
The keyboard and mouse of my 30 year old Mega ST seems to still function, but the keyboard has been dropped many times and it’s bound to break. I found a project [1] on the internet to build an adapter in order to connect a modern mouse and keyboard to the Atari and I’m trying to recreate it.
The original author clearly states that the code is not complete and has significant bugs. That I can confirm, but it’s a very good starting point. I did get it to work to some extend. The software we can improve upon.
1] https://oldcomputer.info/hacks/mega_key/index.htm
When
Even though this project is as basic as it gets for a micro controllers electronics project it took a few attempts. The original project uses an Atmega328. Since this is the exact chip on the Arduino Nano I thought I’d throw one of them at it. Turns out the Arduino Nano I have is one of those cheap fakes with a CH340 instead of an FTDI and probably other issues.
So after the third or so attempt with the Nano I had three options: Give up, buy an expensive original Arduino Nano or build a custom circuit with one of my other Atmega328s in easier to solder DIP packaging I have.
The stripes on the stripe board I have trends to leak solder to neighbouring stripes and my soldering iron is starting to show symptoms of old age with a short circuit in the wiring. Also RJ12 connectors are extremely annoying to solder. All of that adds to the frustration when you’re working on such a seemingly simple project and you want it to simply work. I had to try three different Atmega328 chips until one worked. Could be bad soldering, could be more fake chips from eBay. The third one works very reliably. I need to stop ordering micro controllers from eBay.
Either way I chose to go the long way and build a complete custom circuit and solder the Atmega328 to perfboard.
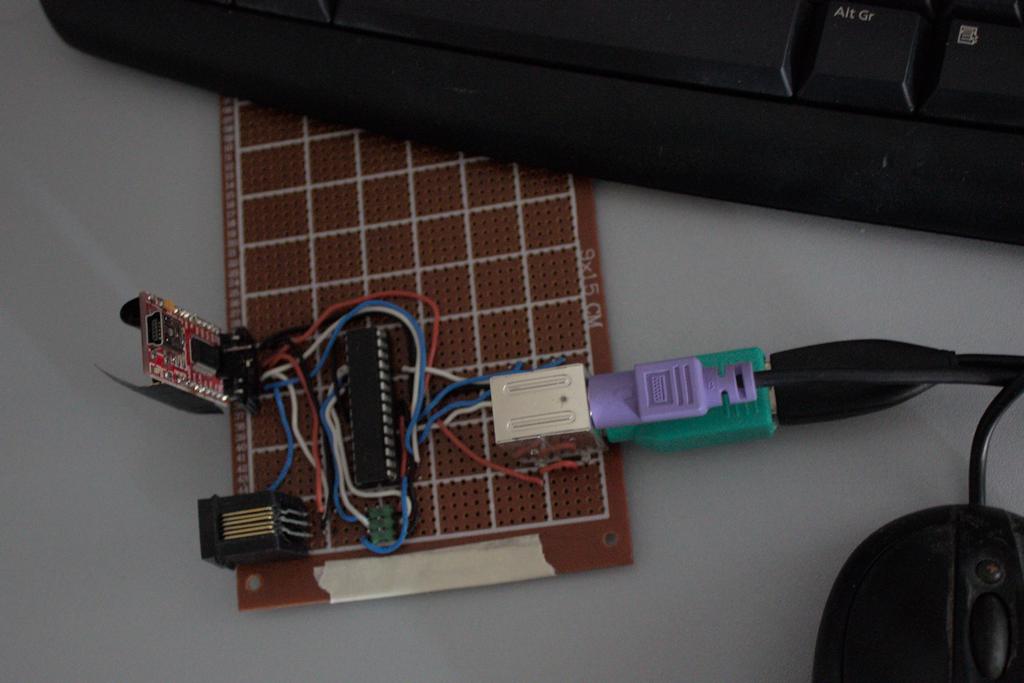
Electronics soldered to perfboard
Why
Background
In order to connect a modern Keyboard and Mouse I need an adapter that can translate from modern interfaces - either USB oder PS/2 - to the Atari protocol for keyboard and mice.
Many USB Keyboard and Mice came with passive PS/2 adapters that can drop the device from USB to PS/2. Now PS/2 is much easier to interface. Since I have a PS/2 compliant USB Mouse and a PS/2 Keyboard I’ll be going for that.
It seems my Microsoft “Basic Optical Mouse” doesn’t work with the adapter, although it does on the computer. The Logitech MX518 works fine. The “Microsoft Wired Keyboard 500”, which comes with a PS/2 plug also works.
How
Hardware
The circuit is relatively standard. We need to wire an ISP socket for programming, a socket for the FTDI serial connection, the PS/2 sockets and the RJ12 Atari Connector.
You could use an Arduino Nano, but original boards have long delivery times and I wouldn’t recommend the cheap knock-offs. The only disadvantage is you’ll need an ISP programmier to program bare Atmega chips. The Arduino Nanos come with a custom boot loader that allows programming via the integrated usb port.
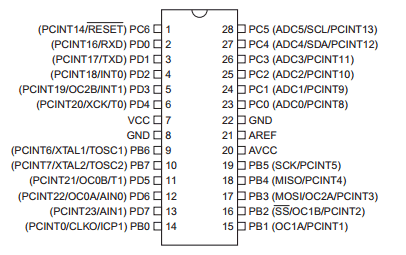
Atmega328 Pinout
Programmer
In order to program an Atmega328 you need an ISP connector.
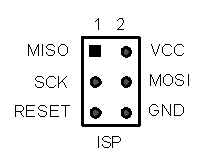
ISP connector
There are 6 wires that need to be soldered: Miso (Master-In Slave-Out), Mosi (Master-Out, Slave-In), Sck (Clock) Reset, Vcc and GND.

Atmega328 ISP connector
Serial Communication
For serial communication I put a 6-pin socket on the board so I can quickly connect and disconnect an FT232RL Serial to USB-converter for debugging.
Note:
- I’m not using a 10k Resistor from Vcc to Reset. I see that in many schematics and it’s probably recommended, but never made a difference for me.
- I’m also skipping an external Oscillator as we can use the internal Oscillator of the Atmega.

FTDI Serial Converter to Atmega
PS/2 Connectors
For the PS/2 Connectors I started with Din5 sockets with adapters to PS/2 for lack of PS/2 sockets. It works the same. In the meantime I’ve ordered proper PS/2 sockets.
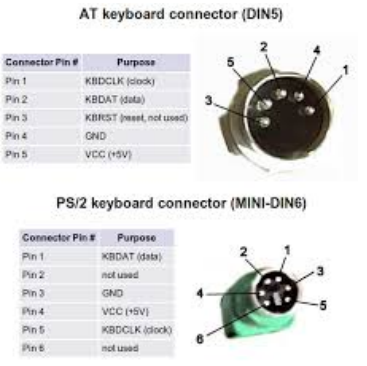
PS/2 and Din-5 connectors
PS/2 connector
The Vcc and Gnd lines are connected to the Atmegas, the Ataris 5V Vcc and Gnc, the FTDI and also the PS/2 sockets. This is okay since we will be using either the FTDI during debugging or the Atari ST keyboard/mouse port.
- Data and Clock for the keyboard go to PD2 and PD3 respectively, als seen in the code.
- Data and Clock for the mouse go to PD4 and PD4 respectively.
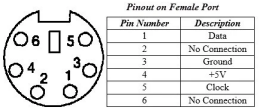
Atari Connector
The Atari Keyboard/Mouse Connector is an RJ12 socket. The outer two pins on both sides are Vcc and Gnd. The two pins in the middle are TX and RX.
Atari Keyboard/Mouse Connector (image from oldcomputer.info)
I use an RJ12 socket, because soldering directly to the fine RJ12 cables tends to break them very easily.
Joystick Connectors
The original schematic has connectors for two Joysticks. I don’t need the joysticks so I’m ignoring them.
Software
We need to hook up the programmer. I’m using AVR ISP MkII from Atmel. Also connect the FTDI to the PC. It not only enables serial communication, but also provides the Atmega328 with power during debugging.
First Test
As a first test to see if everything works we can send some text via the serial Port to the PC.
Because I like to keep things reproducible I wrote a self-contained script and because I’m on Linux I can. The script grabs the Arduino command-line tool, “arduino-cli” and compiles and uploads a short example code that continuously sends “test” to the computer.
#!/bin/bash

if [ -f "$HOME/arduino-cli" ]; then
  echo "arduino-cli exists"
else
  cd $HOME/
  wget https://downloads.arduino.cc/arduino-cli/arduino-cli_latest_Linux_64bit.tar.gz
  tar -xvf arduino-cli_latest_Linux_64bit.tar.gz
fi
arduinocli=$HOME/arduino-cli
And our example code
mkdir /tmp/01-serial/
cat <<EOT > /tmp/01-serial/01-serial.ino
void setup() {
  Serial.begin(9600);
  while (!Serial) { }
}
void loop() {
  delay(500);
  Serial.write("test");
}
EOT
Now as I’m not using an Arduino Nano and I want to be able to set the clock manually the “MiniCore” Arduino board manager is a good option.
${arduinocli} config add board_manager.additional_urls https://mcudude.github.io/MiniCore/package_MCUdude_MiniCore_index.json
${arduinocli} core update-index
${arduinocli} core install MiniCore:avr
${arduinocli} board details --fqbn MiniCore:avr:328
We need to set the fuses of the chip so that we get an 8 MHz clock without clock division by 8. There are online fuse calculators that yield “0xE2” when you set the appropriate checkboxes.
avrdude="$HOME/.arduino15/packages/arduino/tools/avrdude/6.3.0-arduino17/bin/avrdude"
${avrdude} -C $HOME/.arduino15/packages/arduino/tools/avrdude/6.3.0-arduino17/etc/avrdude.conf -v -V -patmega328p -cavrispmkII -Pusb -U lfuse:w:0xE2:m
With that we can compile the code
${arduinocli} compile --fqbn MiniCore:avr:328 --board-options "clock=8MHz_internal" /tmp/01-serial/01-serial.inoand upload it
${arduinocli} upload -P avrispmkii --verbose /tmp/01-serial/01-serial.ino --fqbn MiniCore:avr:328To test if the hardware is working we can keep the FTDI connected and open a serial monitor
picocom /dev/ttyUSB0 -b 9600We should see it printing “test” on the screen continuously.
Actual Code
With the above working we can move to the actual code.
So grab MegaPS2_20180427.7z from the web page [1]
1] https://oldcomputer.info/hacks/mega_key/index.htm
With the above set up and tested we can simply compile and upload.
cd $HOME/
wget https://oldcomputer.info/hacks/mega_key/MegaPS2_20180427.7z
7za x MegaPS2_20180427.7z -o/tmp/

${arduinocli} compile --fqbn MiniCore:avr:328 --board-options "clock=8MHz_internal" /tmp/PS2_Test/PS2_Test.ino
${arduinocli} upload -P avrispmkii --verbose /tmp/PS2_Test/PS2_Test.ino --fqbn MiniCore:avr:328
The code is configured to use a 7812 baud-rate which is due to the Atari ST requirements on its keyboard/mouse port.
picocom /dev/ttyUSB0 -b 7812Connect to the Atari
As the AtariST is to be connected to the same TX/RX lines that we are using for the FTDI we need to remove the FTDI and power the atmega328 directly from the 5V line of the Atari’s Keyboard and Mouse Port.
If the mouse moves, but quickly jumps to the far right side of the screen that can be due to the baud-rate being configured to 9600 - used for debugging - instead of the 7812.
Progress
The whole contraption works to some extent.
- when conncected to the computer via FTDI I can see the lights flashing when keys are pressed and I can receive the Atari commands in the serial monitor.
- because the PS/2 code goes through an initialisation I found you may need to disconnect and reconnect the peripherals for them to be registered.
- the mouse moves perfectly well, but double clicking doesn’t seem to work for me
- on the keyboard some keys don’t work and on my first try the ‘k’ key got stuck and wouldn’t release
It seems most issues are purely software related and I’ll probably do some fixes at some point.
Edit 2023-07-24: I’ve since rewritten most of the software. It’s more stable now, but unfortunately now only either the keyboard or the mouse works, but not both combined. With both combined the mouse stops functioning on the first key press on the keyboard. It doesn’t seem to be an interrupt/serial communication issue, but possibly due to my incomplete Atari serial protocol implementation.